Family FunSpot Activity
Since you can’t visit our centers, we decided to bring the fun to you! We thought this activity would be perfect for keeping your children busy and provide a nice break from your in-home workdays and schooling. Enjoy, and we’ll see you soon!
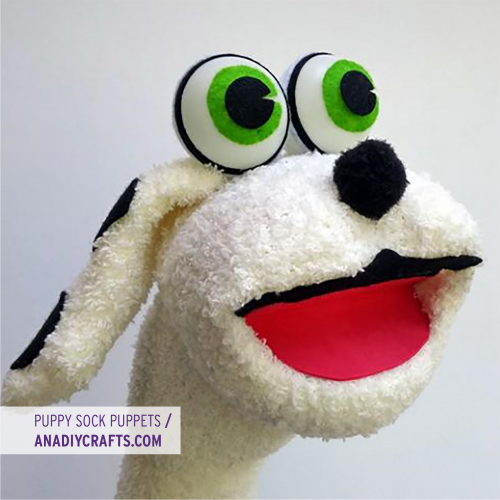
Puppy Sock Puppets
4/1/20
This activity is fun for the kids when you have more than one or two of them at home (Like now, when we are practicing social distancing and homeschooling our children) Let the kids each make their own puppet and then create a silly storyline together and get ready to giggle!
You will need:
- Old socks—tube socks work great
- Craft felt in different colors
- 4”x 8” piece of scrap cardboard
- Hot melt glue gun (adults only)
- Googly craft eyes
- Glitter glue
- Acrylic craft paint
- Fabric scraps
- Yarn cut into various sized pieces
- pom poms
Instructions:
Lay the tube sock flat—toe up and slide the 4”x 8” cardboard piece inside for support—this also keeps the puppet face layer from sticking to the backside of the sock.
Smooth the sock in place so you have a nice surface for designing your puppet.
Start with the eyes. Use the pre-made plastic craft eyes, buttons, or alternately, cut the eyes out of the felt squares. I like the googly craft eyes as they are more expressive. Use the hot melt gun and drop a bead of glue where you want to position them and then attach the eyes.
Use a pom-pom for the nose and attach it with a bead of hot melt glue.
Cut a mouth out of the felt and attach with hot melt glue.
At this time, you can also use the acrylic craft paint and paint additional details.
After the face has cooled and paint is dry, begin gluing the yarn pieces on the top of the puppet’s head with beads of hot melt glue. This will give your puppet personality! Tails, beards and other details can be added with the yarn as well. Long pieces can be ponytailed, braided, or tied with a ribbon.
If you are making an animal, cut some felt into triangles for ears or spots and glue them in place.
You can now use the fabric scraps for accessories—like a scarf or hat and glue into place.
For some additional sparkle and flair, use some glitter! The kids can use Elmer’s glitter glue for this step.
Squeeze and draw with the glitter glue where you want it and let it dry thoroughly.
Once everything is dry, slip our new puppet friend onto your hand and let the fun begin!